Tuesday, April 26, 2011

Pinball Progress!

The first set of strawberries is done! I'm not sure how much they resemble the originals, but their cuteness makes that just fine. It's also very strange looking at it with bright colors instead of the faded colors of the originals--something often true, I find. Reproductions always look so new, don't they?

Strawberry Pinball 1

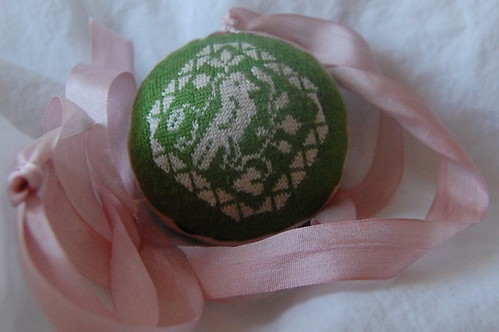
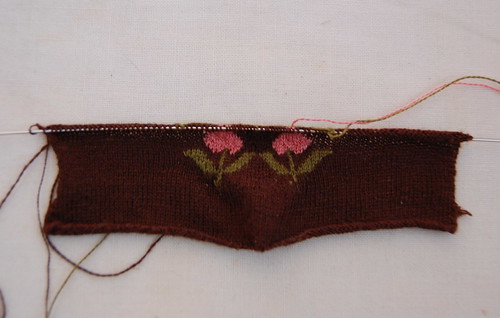
I'm quite pleased with how it's coming out. I think I pulled the floating threads in back a little too tight behind the strawberries though. This won't affect things once it's done, but something I want to be aware of for the next set. Also, three colors? I'm so glad it's only four rows per strawberry! It's exceedingly awkward, what with the super fine threads and all!

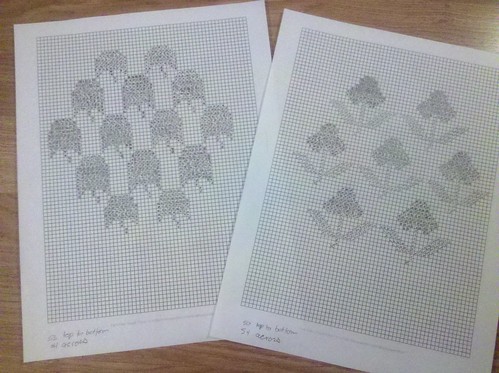
I have had some problems with the chart (this is what happens when a spatially challenged person who can barely hand write anymore and has deficient counting skills tries to make a chart). On the left side strawberry (which really looks more flowery now!), I left off a few stitches. Easy to fix, mentally even.

I did notice that it'll be very easy to make the middle strawberries the same height as the others. Just don't do that extra row! It's just a row of stem, so quite easy to skip.

Today though, near tragedy struck. Yes, I'm being dramatic, but they're my 000000 needles, so I'm entitled to!

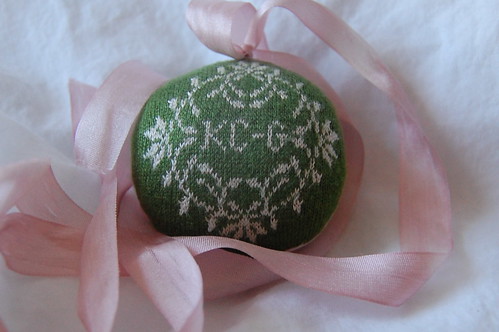
Anyway, I noticed the spacing on the central strawberries was off. One stem started 5 stitches from the previous berry, then the next was six. Visually, not significant, but it bothered me all the same since I thought I had made it even. Then I noticed that the tip of one leaf overlapped the center of the strawberry below, but the other didn't do that. Very odd. Though I doubt it'd be visible in the end, that overlap really seemed to affect the balance of the whole thing.

Then I noticed the central strawberry's right leaf. I added an extra stitch, so one side was one stitch wider than the other. See? Spatially challenged! This made the it so the strawberry on the right was properly aligned and didn't overlap and the one on the left overlapped.

However, finding the mistake made it easy to fix. I marked out the extra stitches on the central strawberry, added them where they should be, made a little note to move the left hand strawberry one stitch over, and now there are two stitches between the central strawberries instead of one. All I have to do is when I'm knitting just concentrate on the ins and outs of each strawberry, which is how I knit these anyway. You only need one strawberry to knit the whole thing. Well, unless you need them laid out to see where to start the next one!

This wasn't the tragedy though. That was five minutes of figuring the same sort of thing I'm always figuring out. I had a little extra time at lunch today, so I was working on this then. After work, I decided to knit the next row just to make sure it was fine. And it was.

Except for the dropped stitch. The entirely unnecessary dropped stitch. You see, when figuring it out, I unknit a half a row. And I thought I had an extra stitch, you know, a piece of the previously knit row or something double wound, so I dropped it. Only, it was a real stitch.

Thankfully, I am good at picking stitches up. It only went down two or three rows. The only tricky part--and I didn't notice this until after the first time I fixed it--was the first stitch was pink, then the next brown. Not too difficult, and I think I got it looking about 95% right. Enough to not be noticeable!

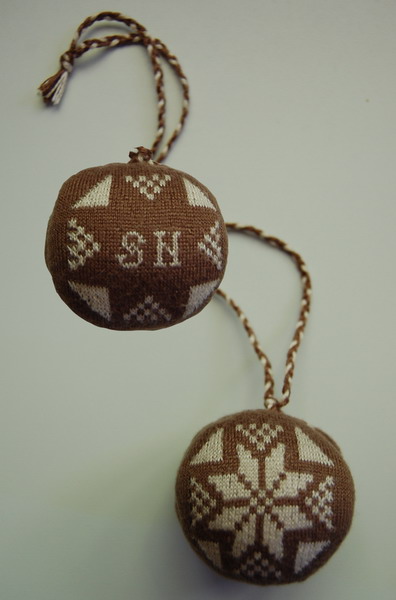
There is a very slight hole though. This, however, just makes it so I will definitely line this in linen. My previous pinballs are unlined, but the inspiration for this one is. I wasn't sure about lining it, I mean, it's so easy not to, but now I think I will. Just a little added protection. I'll just use a very nice, lightweight linen.

And I think that's all for this novel of a post!

Friday, April 22, 2011

Pinball Beginnings!

Strawberry Pinball Supplies!

And here we have supplies for my strawberry pinball.

The adorable bunny thread winders and the pretty other thread winder are new. I think these'll be so much nicer than the cardboard ones I've been using. The weight will be nice and hold the threads down so they don't flop around like they did on the cardboard winders.

And aren't those the cutest scissors? I had been using my blunt tipped safety scissors (they don't hurt when you sit on them, so I use them for most sewing--this is very good advice!), but the tiny size of these was just appealing, and perfect for my knitting bag.

And speaking of knitting bags, I have a completely awesome knitting bag that I bought at Claire's. No, really, there couldn't be a more perfect bag than this. Observe:

My Pinball Knitting Bag

Seriously, could it be any cuter? The kitties! The rhinestones! The bow tie! I bought it during Costume College and it was just the kind of thing that made everyone who saw it smile.

But actually, it's a perfect knitting bag. It's thick enough so the needles don't poke through the way they did with my white tambour embroidered kitty (yes, kitty) reticule that I had been using. It's small enough to stick in my (admittedly oversized) purse so I can take it anywhere, and it's large enough to hold everything.

And it came with a ring. A little sparkly ring :)

In addition to the above supplies, I keep the pattern in there, a green mechanical pencil, spare lead that I figured I might as well take home after whichever student lost it didn't claim it for a year, a needle to weave in ends, my green pinball (for encouragement!) and a tambour hook for dropped stitches. I was so relieved to have that hook the first time (well, every time) I dropped a stitch. It's just too tiny for anything else!

So tonight I begin. Twenty rows of brown for the border, so not particularly exciting yet :)

Knitted Pinballs

About a year ago now, I found out about knitted pinballs--little round pincushions that 18th century women wore from their waists--and of course, had to have one. I had wanted a fabric one for years, ever since first seeing one in Fitting and Proper and later seeing my friend Sarah's on a lovely silver pinball ring from Williamsburg.

It wasn't until seeing the knitted version that that want became need. It helped that there were original knitted pinballs that used ribbon or the same thread as they were knit with instead of a silver ring. Not that I didn't want a silver ring, but rather I couldn't find one. I tried to buy one during Under the Redcoat, but they no longer had them. The following year though, I was able to buy a ring. It's been sitting in a drawer for almost a year now, with nothing in it. Isn't that sad?

Back to knitted pinballs though. I bought this book, Tokens of Love, which has images of knitted pinballs as well as charted designs. It's not clear if they're exact charts of 18c pinballs or if they're inspired by, but it's a lovely book and the charts fit my needs.

And so I knit a pinball! It's green soie d'alger embroidery thread knit on 000000 needles. I used pink ribbon to cover the join. These colors came directly from the pink and green court dress that I was working on when I bought the thread. Though I did choose a softer pink :)

And here's the pinball!

Pinball Front Again Pinball Back

A public Ravelry link to the pinball.

Not to be stopped there, I decided to knit a pinball for Sarah. Hers was a copy of one in Williamsburg's collections.


I even posed it (hooray for bad photoshopping!) similarly to the original :)

A public Ravelry link to the Williamsburg pinball.

And now, with Costume Con sewing coming to a close, I decided to take things a little slowly, use that silver pinball ring, and make a copy of pinball 6974 on this page. Well, and wish I could get the original too!

So tonight I charted the pattern. I doubt it's exact, but it's as close as I could count, and I decided to not put initials on it this time. There is a place on the pinball ring for engraving though!

Pinball Chart

A public Ravelry link to the strawberry pinball.

So tomorrow, I'm going to buy more silk thread. Dark brown for the ground and pink for the strawberries and green for the leaves. I'm so excited to start this. I've been wanting to knit something for quite some time now, and this should satisfy that urge :)

Tuesday, April 12, 2011

A Sneak Peek!

We all know and love the tradition of shoe shots, right? So of course, I took a shoe shot of my favorite around the house shoe and the just finished(!) dress for the historic masquerade at Costume Con. Pictures of that 1 May!

Spotty Shoe Shot

I've practically taken a novel of pictures about this dress, so expect plenty of detail shots and tutorials!

With that though, I should be getting back to the chocolate francaise shortly :)

Friday, April 8, 2011

A Court Skirt

I posted these instructions in my journal on 23 August 2008. There they sit, hard to find, being of no real use. I thought I'd bring them out again!

So, how to make a court petticoat over those very wide hoops! :)

First, prepare your panels. I used three widths of 55" inch silk for the silk skirt in my pictures. My linen underpetticoat is narrower, but only because I thought the reason it wasn't working was it was too full.

To prepare the panels, cut three panels. Cut one in half down the middle. These will be your side panels. So you have a full width in front, a full width in back and a half width over each hip. Sew each seam, hem the skirt if you want, and in the center front and back cut a narrow waist curve--an inch or so deep and a little bigger than half your waist measurement. Pleat these to match your waist measurement and put ties/waistband on both the front and back. This is just like the petticoat on my website. You could do this last, but it's a lot easier to be able to put the skirt on the dressform properly.


Put the hoop on the dressform, and put the skirt--inside out--over that. You will be making a giant stacked box pleat. You do not want this on the outside--it will not be attractive :)


Mark the center of the sides.


Pull the side up until the bottom of the petticoat is level. The edge of the fabric is where you giant stacked box pleat will go. Also, this marks where the pleats along the top of the skirt end.


Put a few pleats in along the top. These should point towards the waist, which means on the right side, they point towards the edge of the hoop. The pleats should end where the giant stacked box pleat will start.


Start pleating. I made my giant stacked box pleat about two inches wide on each side, so about four inches total. The edge of this pleat starts right where the pleats in the previous step stop. You're making a box pleat so that there's an inverted box pleat on the right side. The center of this--where the two pleats meet, essentially--will end up being at the tip of the opening on the petticoat.


One of the pleated sides. Notice, it's just folded back and forth on itself.


Once you've completed one side, do the other. Leave this pleat hanging free. I suppose you could baste it in place when you see where it wants to land, but that's not really necessary.

The top edge of this pleat is perpendicular to the skirt opening.


Baste your pleats while the skirt is still on the dressform.


The completed look from the inside and outside.

To finish the edge, I just bound it with a strip of taffeta. You can see this opening, therefore if you're making a skirt that's going to be seen--no train over it--I'd probably pleat it this way, sew the sides shut, and put an opening somewhere in the waistband. Probably center back, and add a few more pleats and hide it in one of those...

And, the finished dress!


And just for fun, one of my favorite costume pictures ever, although it doesn't show much of the costume--After the Costume College gala, 2008!

Thursday, April 7, 2011

1866 Geneva Hand Fluter

The dress I'm working on for the historic masquerade at Costume Con has a fluted collar. The logical thing to do? Buy a second fluter on eBay! Why a second? The first is the crank sort, but I don't have the heating rods.

Here's a demonstration of it and a picture of the pleats I made the other night. Those have since been turned into a ruff-like collar :)

The video is probably a little longer than it needs to be. Except for the part where my pot holder gets too hot and I toss it aside, it's awfully repetitive. Still, authentic 1860s sizzling sounds!

1866 Geneva Hand Fluter from Katherine on Vimeo.

Pleats!

And an update--I heated both the top and bottom of my fluter in the oven. A friend heated the top and bottom of hers and the top, well, melted. As in molten metal. I think mine may have been a different material? But be careful!!!

Monday, April 4, 2011

Where have I been? What am I up to?

Yes, part five of the sacque draping is coming soon. The front is important!

However, I've been sidetracked, or rather I should say, this was the project that sidetracked me from what I was working on and I'm back to that. You see, in less than a month (*faints*), I'm going to be in the Costume Con masquerade in an as of yet unfinished dress. It's totally doable in the amount of time I have, but I've gone into manic sewing mode because it's rather stressful that it isn't done. My masquerade dresses have always been done long before the masquerade!

Anyway, each tutorial takes about an hour to write, which isn't so bad, but the more time I spend on the computer, the less I feel like sewing afterward. So the tutorial is on hold for the moment. If you click on any pictures though, you'll go to the Flickr set where you can browse the rest of the pictures.

So, there's my excuse! It is coming though. And there will be a ton of spotty dress pictures and information after the masquerade :)